What Speedometer for iPhone and iPad is good for:
- Showing the speed of your movement, altitude of your location, trip distance, compass direction and GPS based heading (from version 1.4.8).
- Alerting you on exceeding the preset speed limit.
- Sharing your coordinates by email or text message.
In this manual we will be using screenshots taken on iPad or iPhone interchangeably, as controlling the app on both devices is just the same. And we use km/h and mph or miles units interchangeably as well. From version 1.4.8 speedometer will support knots in addition to mph and km/h.
Starting the app, location services and GPS indicator.
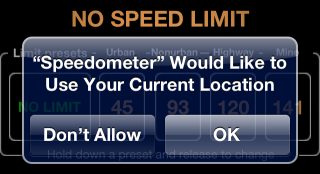
For the correct application functioning you should select OK. We guarantee that your location data are only used for the speed and distance calculations and NEVER leave Your iPhone or iPad (unless when you explicitly decide to share your coordinates via the "Share my location" option)
If you tapped on OK, we can continue exploring the speedometer.
If, by chance, you tapped on "Don't allow", this can be fixed by going into the Settings->Privacy->Location services (before iOS6: Settings->Location Services) and setting the location switch for the speedometer app into ON position:

Given location services are enabled, speedometer app will wait until the location accuracy reaches the values corresponding to GPS reception. Until that time, no speed digits will be shown:
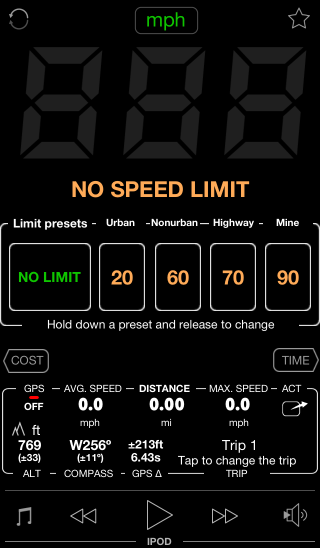
We can follow the accuracy by means of a GPS indicator:
 In case when no location coordinates can be established, indicator is white and says OFF. If indicator stays like that for more than few seconds, please check if access to location services is enabled. Indicator will also stay white/OFF in case when there is none of the GSM, wifi or GPS signal available. At least one of those networks would give iPad/iPhone ability to find its location, though question will be about the accuracy.
When at least of the networks (GSM, wifi, GPS) is present, dependent on the location accuracy GPS indicator will turn either red, yellow or green.
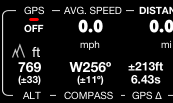 Red color with value of OFF means that location accuracy is not enough to calculate and display the speed. Image on the left serves as an example for wifi based location resolution. Its characteristic accuracy is about 65 meters (200 ft). As we can see altitude value is also provided is such case.
Lets skip over yellow with value of WEAK, it will appear when accuracy is getting from a cellular cell based (200-2000 meters) or wifi (~65 meters) to a GPS based accuracy.
 When accuracy reaches 20 meters (25 meters for iPhone 3GS), GPS indicator will turn green with value of STRONG.
Now it makes sense to measure the speed!

If in Your case indicator stayed Red, just make sure you have location services enabled and you are trying actually under the open sky. GPS accuracy of location can't be reached inside buildings as iPhone/iPad can't "see" the satellites.
Oh, and lets set up the speed units!

From version 1.4.8 you can also set the speed units by tapping on the settings button in the top left corner and invoking the settings window.
Let's drive!
But before we hit the road, lets configure the speed limits.
Not afraid of tickets - setting the speed limits.
 We have 4 preset buttons and can easily change name and value for any of them. Just hold tap and hold the preset button for 1 second, then release and you'll see the options to change the name and value:
What are preset values that author is using? Okay, I set 55km/h for the city for example, as where I live the limit is 50km/h, but they start ticketing you from around 60km/h. This can be specific for any country/city though.
There is also a dedicated article on changing preset value with use of iPad (truly, just the same)
What about sound alert?
Digits will become red when the applied limit is exceeded, but we will more probably look at where we drive, not at the speedo? That's where the sound alarm will come handy. Alarm level is the same as level of a music player set (so the alert is audible through the music played). Lets check in the music app, the best level for a start would be at least half or 2/3 of max, to compensate the other noises in the car. For iPhone5 or starting with paid version of 1.4.8 for other devices as well the level can be set via the integrated iPod player.You can read a dedicated article on the audio alert troubleshooting.
Now let's just tap on the desired preset button to apply the limit and let's go/drive? Just don't be caught unprepared by the alert sound :)!
I want more! Counters and Trips.
Counters.
There is a trip counter or odometer (possible with few counters) in every car. Speedometer app has counters as well. You can control the counters via the ACTION (ACT) button:
Here are available options:
.PNG)
"Reset counters" option will reset all of the counters - odometer and avg/max speeds. In case when you are using multiple trip counters, this will also reset the maximum and minimum altitudes of your trip.
Trips.
You can use multiple trip counters. That is useful when you want to track separately driving to work and shopping for example. In order to switch the trip, tap on the "Tap to switch the trip" area.
You can still tap on this area at any time to invoke the trip control window.
Tap on a trip switch will open the trip control window:

Jumping a bit ahead, the sign of ¤ means "a currency unit" and in the paid version we show here the total cost of your trip based on your car fuel consumption and amortization metrics. This piece of data is missing in a free version.
In order to select the trip to use, just tap on it. Green dot in the list identifies the currently active trip.
To rename the trip or reset its individual counters tap on Edit and then on the trip you want to change.
Lets skip over the trip editor window, it is really simple.
Tap on a + button to add a new trip.
I want even more. Working in background! (Paid version only)
In free version, in case when you make a call, someone calls you or perhaps you have to use some other app, Apple will put speedometer app to sleep and it will not be able to update counters or alert you when going over a preset speed limit.With paid version, you are able to switch speedometer app into the background execution mode. Lets use the ACT button again and select the option "Work in background":

It is quite recommended to switch the background mode OFF when you finished driving, so the app will not drain the iPhone/iPad battery when you don't really need it.
When in background mode, the app will update the trip counters and alerts you about going over the applied speed limit even when you are in the call or have a screen locked.
GPS tracking (Full version only)
From version 1.5.1 speedometer provides GPS track recording function. You can read more here: How to record and share GPS tracks
How to setup a trip cost monitor and know the cost of a trip as I drive? (Full version only)
iPhone/iPad Trip Cost Monitor – “My friends use me as a taxi!!! How do I use Trip Cost Calculator as a taximeter?”
Trip Cost Monitor for iPhones and iPads. “I want to know the cost of driving to work, shop or anywhere!”
Cost monitor setup for UK MPG
There are so many features in speedometer! This manual only describes the basics. You can read on what was added in version 1.4.9: http://blocoware.blogspot.cz/2013/02/iphone-ipad-speedometer-version-149_12.html and 1.5.1: http://blocoware.blogspot.cz/2013/06/iphone-and-ipad-speedometer-version-151.html and we are surely preparing the new release with more options (1.5.2): http://blocoware.blogspot.cz/p/beta-152-whats-new.html
No comments:
Post a Comment